
Contents
- Help me repair my ding
- I have a surface ding
- I have a deep, foam penetrating ding
- Why should I use Soltek
- Soltek is a Rapid UV cure Ding Repair for repairing surface dings, dents and scratches.
Repairing your board with Soltek
Getting the best repair results with Soltek is easy. To show you how simple it is and the amazing finish, we have included two examples which explain the steps involved in repairing your board damage or ding.
Example 1: Repairing surface spot dings using Soltek
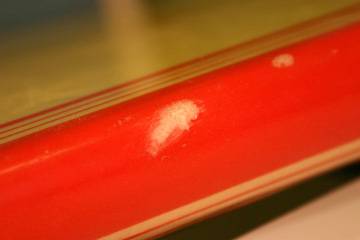
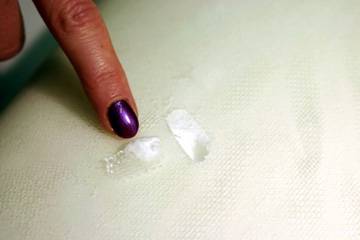
Step 1: Surface ding on red rail needs to be repaired to prevent further damage to the board from water.
Step 2: Prepare application area by removing grit, wax residue and foreign substances. Sand the application area using the coarse (rough) sandpaper.

Be careful when sanding to restrict to the ding area only.
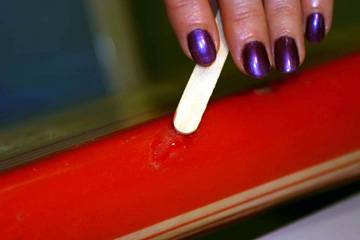
Step 3: For best results, use ‘Soltek to repair the damaged area.
Use Soltek UV to repair the damaged area
Step 4: It is better to use less resin since you can always add more after curing (step 7).
Remember to apply the resin away from the sun or any other source of UV light until ready to cure (Step 7)
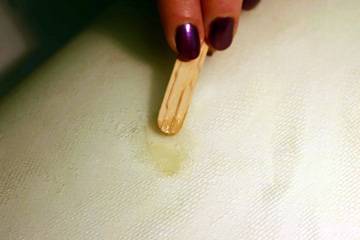
Step 5: Use a wooden applicator to spread the resin and push into the damaged area.
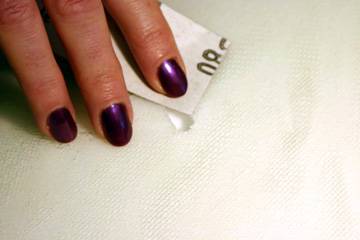
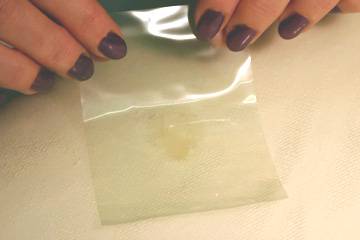
Step 6: Place plastic overlay film over the spread resin. Pull tight.
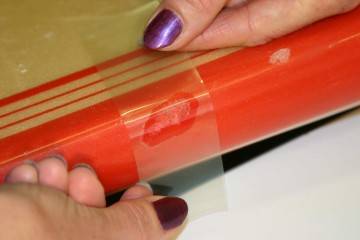
It is important you use the plastic overlay since it will produce a smooth, professional finish.
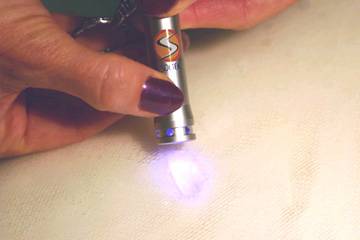
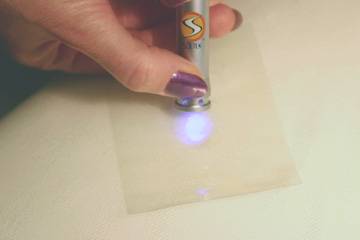
Step 7: Cure the resin through the plastic overlay film until the resin is hard. Pull the plastic overlay off when cured.
Tip: Tap the resin with your fingernail or wooden applicator to see if the resin is cured.
Tip: You should always use the sun to cure your ding when available. It is the most powerful source of UV light and is the quickest way of effecting cure.
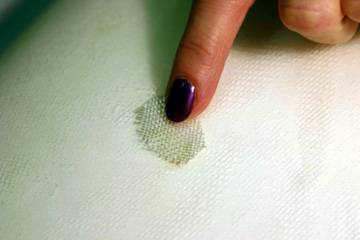
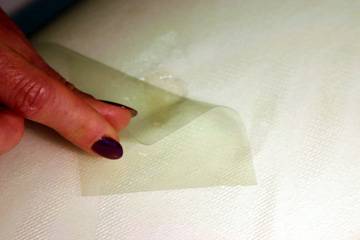
If you used the plastic film overlay during curing you should get a smooth finish which does not require further sanding. If sanding is required, use a fine sandpaper very, very lightly or wet and dry.
Example 2: Repairing deep dings with Soltek
Complete UV Repair is needed when both the foam and skin are damaged.
A chunk of foam has fallen out as a result of the damage. The resulting hollow will need to be filled and then a new skin will need to be applied using some new glass fibre cloth.
Step 1: Prepare application area by removing grit, wax residue and foreign substances. Sand the application area using a coarse (rough) sandpaper.
Careful when sanding to restrict to the ding area only.
Ensure any sanding residue is removed from the hollow before filling in the next step. This can be done by blowing or tipping the board up, to allow any residue to fall out.
Step 2: Using the Soltek prepared resin, fill the hollow until level with outer board skin.
CAUTION: If the hollow is deeper than 3mm, then you will need to layer the filling application. In such cases, fill the hollow with around 3mm of resin and cure (as per Step 3). Once cured fill the hollow again with around 3mm of resin and cure. Repeat until the hollow has been filled to outer board skin level
Step 3: Cure the resin until the resin is hard, use uv light or direct sunlight.
Tip: Tap the resin with your fingernail or wooden applicator to see if the resin is cured.
Tip: You should always use the sun to cure your ding when available. It is the most powerful source of UV light and is the quickest way of effecting cure.
Step 4: Cut a piece of fibreglass to cover the filled foam hollow. Allow sufficient glass to overlap with the surrounding undamaged board skin to form a good bond.
Step 5:
Remember to apply the resin away from the sun or any other source of UV light until ready to cure (Step 9)
Step 6: Use the applicator to spread the resin
Step 7: Use the applicator to both push the resin down into the patch and spread around the surrounding area (to form a good bond).
Tip: When the resin is well spread, the patch should look like glass (i.e. transparent). This step is commonly called ‘wetting out’ and if your patch doesn’t look transparent at this stage then add more resin before going on to the next step.
Step 8: Place the plastic overlay film over the spread resin and wetted out fibreglass patch. Pull tight.
It is important you use the plastic overlay since it will produce a smooth, professional finish.
Step 9: Cure the resin through the plastic overlay film until the resin is hard.
Tip: Tap the resin with your fingernail or wooden applicator to see if the resin is cured.
Tip: You should always use the sun to cure your ding when available. It is the most powerful source of UV light and is the quickest way of effecting cure.
Step 10: Peel off plastic overlay.
Step 11: Lightly sand using fine grit sandpaper only if required.

If you used the plastic film overlay during curing you should get a smooth finish which does not require further sanding. If sanding is required, use the fine sandpaper very very lightly or wet and dry.
Why should I buy Soltek
There is a big difference between Soltek and its competitors. Soltek is by far the strongest and clearest to repair dings. Most competitors use a fiber-fill formulation for their UV curing ding repair. In fact if you look at them closely you can see lots of little short fibres distributed through what looks like a cloudy resin. The resin is cloudy because it contains fillers – cheap additives designed to bulk out the resin and make it thicker. The problem with additives is that they weaken the resin. An even greater problem however, is that when combined with short fibres, the entire system develops millions of small delamination and cracking points which weaken the resin even more.
Added to this, the resin never dries absolutely clear. It simply can’t because the additives give it a cloudy look. So when you use these systems to fix the dings on your board they stick out like a sore thumb! The additives also initiate a hardening reaction within the tube. This means that all the resin in your tube will go hard even if you haven’t used it. To top it all off, the resin will go a browny/yellow over time making the repair look even more unattractive.
We designed Soltek UV to overcome all these problems. Instead of taking the easy way out and using fillers to bulk out our resin, we have chemically formulated it to not only give a good consistency for repair, but to be 2 to 3 times stronger than any other competitor product. We don’t have to include fibres because we have chemically engineered the strength into the resin. The resin system is consistent meaning that it doesn’t have delimitation and cracking points. Most importantly though, when it cures it gives you the best finish on the market. Our Clear is the clearest!
As a surfer, you need to know that when repairing your board it is very important to use the strongest resin possible. Damage or a ding to your board creates a weak area and heightens the probability of further damage around the general vicinity. Soltek UV is so strong, stronger than the base resin on the board in fact, that it provides strength to the damaged or dinged area, lessening the chance of further damage promotion.
If you want peace of mind, and the best possible repair job—get Soltek UV today. What’s more, buy a colour or make your own to match your board—it’s all possible. YOU CAN PURCHASE A SIZE 4K SIZE BOTTLE THAT WILL CURE A 4 LITTRE TIN OF RESIN, THE SIZE OF A PAINT TIN.